React Native - 踩坑纪录

记录下自己在 RN 开发中遇到的一些问题。

RN 组件相关

TextInput

  1. Android 文字对齐问题

当 TextInput 高度超过一行文本时,发现文字显示在 iOS 上是顶端对齐,而在 Android 上则是垂直居中,如下图:

text_input_differ

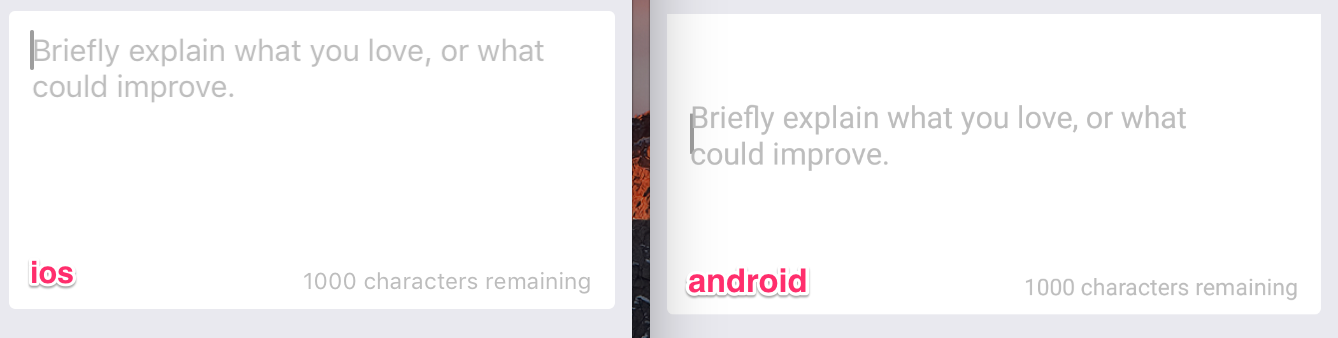
解决方法是通过为 TextInput 设置 textAlignVertical: "top" 属性,相关 issue 见:Render Multiline Text at start instead of center

  1. Android 上 TextInput 接收获得焦点之后键盘无法自动收起

这时候我们可以给根布局设置接收触摸事件:

1
2
onStartShouldSetResponder={() => true}
onResponderRelease={() => Keyboard.dismiss()}

这样当输入焦点之外区域触摸后,通过调用 Keyboard.dismiss() 方法强制收起键盘,曲线救国。

  1. iOS 上无法清除文字

这个问题只出现在 RN 版本 0.55.x,如果不升级的话只能用下面比较不优雅的方式来解决:

1
2
3
4
5
6
7
8
9
clear() {
if (Platform.OS === 'ios') {
this.input.setNativeProps({ text: ' ' });
}

setTimeout(() => {
this.input.setNativeProps({ text: '' });
});
}

相关 issue 见:issues/18272

KeyboardAvoidingView

  1. behavior 相关

该组件在 Android 和 iOS 上的表现有区别,所以我们会区分平台使用不同的 behavior,比如下面这样:

1
2
3
4
5
<KeyboardAvoidingView
behavior={Platform.OS === 'android' ? null : 'padding'}
keyboardVerticalOffset={64}>
...
</KeyboardAvoidingView>

padding 模式下,当键盘弹起的时候,你的 view 会向上弹起并被压缩。使用 padding 作为 behavior 的时候,在 iOS 上表现比较好,而在 Android 上则不设置 behavior 比较好。

position 模式下,view 整体会向上滑动。这种模式 Android 和 iOS 上表现一致,但是前提是此时 KeyboardAvoidingView 是根 view。同时这也会造成一个问题,那就是键盘弹出后,输入组件会一直占有焦点,这在安卓上还好,可以通过返回键关闭键盘,而在 iOS 设备上就会造成键盘无法被关闭的尴尬。解决这一问题的方法是通过在 KeyboardAvoidingView 设置接收触摸事件,当在输入焦点之外获得点击时收起键盘:

1
2
3
4
5
<KeyboardAvoidingView 
behavior={'position'}
onStartShouldSetResponder={(evt) => true}
onResponderRelease={() => Keyboard.dismiss()}
/>

ImageBackground

  1. imageStyle 属性

有没有发现给 ImageBackground 设置 style 的时候,其中某些属性似乎不起作用?比如设置 border 似乎没有效果。其实看下源码就可以发现,原来 style 属性里面还有个 imageStyle 属性,类似 borderborderRadius 这样的属性要设置到 imageStyle 上才有效。

FlatList/SectionList

  1. contentContainerStyle 属性

与 ImageBackground 类似,在给 FlatList 设置 paddingBottom 的时候,发现不起作用,后来在这个 issue 下找到了解决办法:FlastList/SectionList 中有个 contentContainerStyle 属性,代表 list 中的 content 容器的 style 属性。所以如果想要为 list 设置 paddingBottom,在这个属性上设置才能起作用。

  1. 加载时的性能问题

我们知道在 Android 中加载大量列表数据时,RecyclerView 的性能是比较好的,因为它可以复用 view,而在 RN 中如果你用 FlatList 直接加载成百上千的数据的时候,你会发现整个界面会变得非常卡,所以这种情况下我们就需要懒加载。FlatList 本身是支持增量加载的,只不过需要一些额外的处理。

首先,FlatList 中有一个 initialNumToRender 属性,用于指定初始加载的数据,我们可以设置为 10,这个看你的需求了,一般根据 item 的高度来定。然后 FlatList 还有一个 onEndReached 属性,我们可以在这里定义一个方法,用于指定当列表滑动到底部的时候触发的事件。有了这两个属性,我们就可以对 FlatList 中的数据进行懒加载了。

1
2
3
4
5
6
7
8
9
10
11
<FlatList
style={styles.productListStyle}
data={this.state.productList}
renderItem={({item, index}) => <ProductItem />}
initialNumToRender={10}
numColumns={2}
onEndReached={() => this.lazyLoadProducts()}
onEndReachedThreshold={0.5}
ListHeaderComponent={this.props.ListHeaderComponent}
ListFooterComponent={(this.state.productList.length !== this.props.productList.length) ? <ActivityIndicator style={styles.activityIndicator} size='large'/> : undefined}
/>

可以看到,FlatList 中数据源来自 this.state.productList,然后在 onEndReached 中调用了一个 lazyLoadProducts 方法:

1
2
3
4
5
6
7
8
9
10
lazyLoadProducts() {
if (this.state.productList.length === this.props.productList.length) {
return;
}
this.setState(state => ({
productList: state.productList.concat(
this.props.productList.slice(state.productList.length, this.state.productList.length + 10)
.map(item => ({...item, key: item.id})))
}));
}

我们首先将完整的数据保存在 props 中,然后在 onEndReached 中每次多加载 10 条新数据。

可以看到上面的 FlatList 中还定义了一个 onEndReachedThreshold 属性,表示 FlatList 可见部分离底部多远的时候会触发 onEndReached 方法。比如我们定义为 0.5,则如果可见部分为 10 条数据,那么当我们向下滑动 5 条数据的时候,就会去加载另外 5 条新数据。

PanResponder

  1. onPanResponderMoveAnimated.event() 的结合使用

利用 PanResponder 做了一个拖动调节图标位置的功能,网上找的方法是在 onPanResponderMove 中使用 Animated.event() 来对 View 进行移动。实现效果不错,但是发现一旦在 onPanResponderMove 中使用了 lambda 表达式后,就不起作用了。后来网上找到这个 issue,发现原来 Animated.event() 会返回一个方法,并且接收 event 和 gestureState 作为参数,所以我们只要去调用一下这个方法即可:

1
2
3
4
5
6
onPanResponderMove: (evt, gestureState) => {
return Animated.event([null, {
dx: this.state.pan.x,
dy: this.state.pan.y,
}])(evt, gestureState)
}

UIManager

我们可以使用 UIManager 来测量某个 view 的位置,这个在一些特殊的场合非常有用。

测量某个 view 的位置前,我们首先需要获得该 view 的引用:

1
2
<YourView
ref={component => this.myView = component}/>

获得 view 的引用后,就可以通过 view 获得 nodeHandle 去测量 view 的位置了:

1
2
3
4
5
6
7
8
measurePosition() {
let nodeHandle = findNodeHandle(this.myView);
if (nodeHandle) {
UIManager.measure(nodeHandle, (x, y, width, height, pageX, pageY) => {
// measure success, do something with the data
});
}
}

从示例代码中可以看到,在测量方法中,我们定义了一个测量成功的回调,我们可以在这里获得测量到的当前 view 的中心点坐标,高度,宽度,距离页面顶端的 x 坐标,y 坐标。

其他 Tips

  1. diplay: none 在 Android 上失效的问题

这个一般是由于和 position 混用造成的,只要在需要使用 display: none 的组件外添加一个 用于控制 absolute 位置即可:

1
2
3
<View style={{position: 'absolute'}}>
<View style={{display: 'none'}} />
</View>

更进一步,为了防止你隐藏掉的 View 阻挡被覆盖的其他 View 的点击事件,以及在需要隐藏的 View 里存在可点击的组件,则还需要使用到 View 的 pointerEvents 属性做以下设置:

1
2
3
<View style={{position: 'absolute'}} pointerEvents={this.props.show ? 'auto' : 'none'}>
<View style={{display: 'none'}} />
</View>

当展示出来的时候才可点击,如果隐藏则不接收点击事件。

  1. 组件循环更新的问题

有一种常见的场景是,当有一个组件 A 使用外部组件 B 的 state 作为 prop,并且组件 A 通过回调方法来传送数据(setState)给外部组件时,此时如果外部组件 B 在回调方法中也调用了 setState 方法,那么就会造成内部组件的 state 循环更新的问题。

一种解决方法是在组件 A 中的每一个需要传送数据到外部组件中的方法(setState)中添加一个标记,然后在 componentDidUpdate 中根据该标记来判断是否应该对回调方法进行调用。如下:

1
2
3
4
5
6
7
8
9
10
11
12
13
14
15
16
17
18
19
20
21
22
23
24
25
26
27
28
29
// region 内部组件
componentDidUpdate(prevProps, prevState) {
// flag 为 true 时才进行回调
if (this.state.stateUpdateFlag) {
// 通过回调传递数据给外部组件
this.props.callback(_.omit(this.state, ['stateUpdateFlag']));
this.setState({stateUpdateFlag: false});
}
}

_updateContent(data) {
// ... 其它代码
this.setState({
data,
stateUpdateFlag: true
});

// 外部组件的回调方法中如果调用了 setState 方法,则用会造成内部组件 state 循环更新
// this.props.callback(data);
}
// endregion

// region 外部组件
render() {
return <InnerComonent
innerData={this.state.formData}
callback={(data) => this.setState({formData: data})}/>
}
// endregion
  1. 屏幕闪动的问题

在 RN 0.62 以上的版本,如果为图片添加 flex: 1 的 style 就会出现页面闪动的情况,去除之后就能解决。

三方库相关

常见问题

  1. 三方库无法下载,卡在 checking installable status

    这种情况大概率是你之前下载过,导致机子本地 npm 缓存与三方库冲突。此种情况,我一般通过全局安装,然后使用 npm link 来解决。

  2. 依赖未正确 link 导致的报错

    很多时候安装三方库之后都会遇到各种各样的报错,这种时候不要慌,先对照三方库 README 检查下是不是缺了某些步骤,如果还是无法解决就去翻翻 issue,然后再使用谷歌搜索关键字。不要急着求助,因为 99.99% 的情况下,你遇到的问题别人早就已经遇到过了。

    实在不行就把依赖删了然后重新安装并一步步检查 link 步骤有没有漏掉。

  3. 重启电脑可以解决大部分令人原地爆炸的奇怪问题。

@ant-design/react-native

  1. 3.x 版本一些组件 bug 很多,比如 Modal 等,还有使用的 ViewPager 版本过旧,如果造成 “register two views with the same name RNCViewPager” 的问题可以尝试删除 @ant-design/react-native/node-module 下的 @react-native-community/viewpager。

react-redux

  1. action 名字尽量不要和 reducer 的名字一样,这样会导致调用 action 的时候报 “xxx is not a function 的错误”。
    关于如何使用可以看我之前写的文章:React Native - Redux 入门React Native - 从 Redux 进阶谈起

react-native-scrollable-tab-view

在 Android 中,如果在该库的核心组件 ScrollableTabView 外嵌套使用了 ScrollView 的话,就会出现在 ScrollableTabView 中的内容无法显示的问题,在 iOS 上却又没有这个问题。

找了很多解决方案,但是都不太可用,比如为 ScrollViewcontentContainerStyle 设置 {flex: 1}。但是这样一来整个 ScrollView 就无法滚动了,所以摸索出一个可行的解决方案是为 contentContainerStyle 设置高度:

1
2
3
4
5
6
<ScrollView contentContainerStyle={Platform.OS === 'android' ? {height: 2000} : null}>
<ScrollableTabView>
<TabOne/>
<TabTwo/>
</ScrollableTabView>
</ScrollView>

这种方法只能算是一个 hack 吧,即使是通过测量 view 的高度也不是很好,因为如果 tab 是很长的一个 list,会造成比较大的性能开销,而如果动态增加 ScrollView 的高度的话,要是 tab 里面包含长图也会需要做额外的处理。所以还是不推荐嵌套 ScrollView 使用。

react-native-puti-pay

这是一个微信和支付宝支付库,如果集成该库的同时也集成了 react-native-wechat,则会造成冲突:

1
2
3
duplicate symbol _OBJC_CLASS_$_WechatAuthSDK.xx
duplicate symbol _OBJC_IVAR_$_WechatAuthSDK.xx
...

上面只列出了两种冲突项,全部的冲突项可能达几十个,主要是因为这两个库同时引用了 libWeChatSDK.a,所以只要删除其中一个库中的该引用即可。

react-native-debugger

配合 redux 使用:

1
2
3
4
5
6
7
8
9
10
11
12
13
14
15
16
import {applyMiddleware, combineReducers, compose, createStore} from 'redux';

const allReducers = combineReducers({...});

// 开启 REDUX DEVTOOLS 支持
const composeEnhancers =
typeof window === 'object' &&
window.__REDUX_DEVTOOLS_EXTENSION_COMPOSE__ ?
window.__REDUX_DEVTOOLS_EXTENSION_COMPOSE__({
// Specify extension’s options like name, actionsBlacklist, actionsCreators, serialize...
}) : compose;

// 通过 reducer生成 store (封装中间件)
let store = createStore(allReducers, composeEnhancers(applyMiddleware(thunkMiddleware)));

export default store;

在 console 中获取 AsyncStorage 中的数据:

1
showAsyncStorageContentInDev()

react-native-router-flux

  1. 实现 Android 上连续点击两次返回键退出

这个在安卓上是比较常见的操作,但是在 RN 中结合 react-native-router-flux 使用却折腾了好长时间,这里记录下自己的实现方式。

首先,react-native-router-flux 原生就支持,我们不需要通过自己去添加 BackHandler 监听器来实现。当我们使用 react-native-router-flux 时,我们一般用 Router 作为根节点,所以我们通过 Router 为其设置 backAndroidHandler 属性即可。

1
2
3
4
5
6
7
8
9
10
11
12
13
14
15
16
17
18
19
20
21
22
23
24
let lastBackPressed = Date.now();
const onExitApp = () => {
if (Actions.currentScene !== 'home') {
Actions.pop();
return true
}
if (lastBackPressed && Date.now() < lastBackPressed + 2000) {
BackHandler.exitApp();
return false;
}
ToastAndroid.show('再按一次退出应用', ToastAndroid.SHORT);
lastBackPressed = Date.now();
return true;
};

class AppRouter extends Component {

render() {
return <Router backAndroidHandler={onExitApp}>
<Scene key='home' ...>
{/* other code */}
</Router>
}
}

可以看到,这里定义了一个 onExitApp 方法并且设置到了 backAndroidHandler 属性上,该属性会根据返回值来决定是否退出应用(false 时退出应用)。

onExitApp 中,我们首先判断当前应用是否处于根页面(可以通过 react-native-router-flux 中的 Actions.currentScene 获取当前 Scene),如果不是根页面则作为普通的返回键处理(弹出一页),否则判断是否在指定时间内连续点击,连续点击才退出应用,否则弹出 Toast 提醒。

  1. 在 Android 上点击返回键时使 WebView 后退一页

假如有这样一个需求,某个页面下有一个 WebView 组件,我们需要控制当在该页面按下返回键时后退一页(相当于从网页的历史记录中后退),而如果没有历史记录时则直接退出。这个要怎么实现呢?

注意到,WebView 中有一个 onNavigationStateChange 方法,当新的页面加载或退出时该方法会被调用。因此一种可行的方法是,在该方法中监听页面变化并读取页面加载后的数据。以下是该方法中的部分数据:

1
2
3
4
5
6
7
canGoBack: true
canGoForward: true
loading: false
navigationType: "other"
target: 187
title: ""
url: ""

因此,可以通过事件中传回的 canGoBack 值判断此时 WebView 是否可以返回,如果可以则使用 WebView 的 ref 去调用 goBack() 返回上一页,否则使用 Actions.pop() 退出当前页面。

基本代码如下:

1
2
3
4
5
6
7
goBack = () => {
if (this.state.canGoBack) {
this.refs.webView.goBack();
} else {
Actions.pop();
}
};

当然由于返回按钮可能不在当前组件下,如果你使用的是 react-native-router-fluxreact-redux,则可以定义一个返回按钮的组件,该组件通过全局 state 树接收点击事件的 function,然后设置到 ScenerenderLeftButton 属性中,最后,在需要处理 WebView 的地方设置返回事件到返回按钮中即可(注意:react-redux 是可以接收 function 作为属性的,不然就没法设置事件了)。

react-native-amap3d

这是一个高德 3D 地图库。

  1. 安装失败以及冲突

该库 iOS 部分只能使用 CocoaPods 安装,花了很多时间在安装 Specs 依赖上,只要一 pod install 就会卡在 cloning into /Users/xxx/.cocoapods/repo/master

尝试了很多国内镜像,发现大多数都已经不能用了,然后也尝试了国内镜像 clone Specs~/.cocoapods/repos/master 里,发现也没啥用,因为 install 的时候还是会识别不了(因为太久没更新)。

后来发现原来这东西的确只能从官方的 Github 上 clone,只不过由于体积比较大(几个G,被限速了),只要耐心等待它 clone 完毕就行了。反正每台电脑只要操作一次就够了,后面的更新基本都很快的。

花了一晚上 clone 完,然后 install,结果编译还是不通过,老是报依赖找不到(ld: library not found for -lDoubleConversion)。尝试各种方案无果,后来看到一个 stackoverflow 上的回答才明白,原来使用 cocoapods 的项目要通过 .xcworkspace 打开项目而不是 .xcodeproj。发现真相的我差点眼泪掉下来。

然后重新打开项目跑了之后,依旧继续报错(duplicate symbol _aes_encrypt_key128 in ios/Pods/AMap3DMap/MAMapKit.framework/MAMapKit)。

清理了缓存(npm cache clear –force ; watchman watch-del-all ; rm -rf $TMPDIR/react-* ; rm -rf ~/.rncache)重新安装依赖(rm -rf node_modules && npm install)后,问题依旧存在。

你以为我要崩溃了吗?不,作为一个程序员怎么能这么容易就崩溃?当然是去玩几把 FIFA 然后回来继续解决问题啊。

仔细看了下报错信息,发现是 react-native-amap3d 和 react-native-update 中的 libRCTHotUpdate 存在重复 symbol 所以一直编译不过。

确定问题后解决起来就简单了,搜到了这篇文章。原理很简单,把 react-native-amap3d 中会造成 symbol 重复的内容去掉就可以了(因为只是 x86_64 这一个平台中的重复 symbol,所以影响不大,如果是其他平台,操作也类似),具体步骤如下:

  • 首先定位到 MAMapKit.framework,project_name/ios/pods/AMap3DMap/MAMapKit.framework,将其中的 MAMapKit 复制出来

  • 将 MAMapKit 中 x86_64 平台的部分提取出来并命名为 MAMapKit.x86_64:

1
lipo -thin x86_64 MAMapKit -output MAMapKit.x86_64
  • 将其中包含重复 symbols 的部分查找出来并保存的 symbols 文件中:
1
2
3
4
5
6
7
8
nm -j MAMapKit.x86_64  | grep aes > symbols

# symbols 文件内容如下
_aes_decrypt
_aes_decrypt_key128
_aes_encrypt
_aes_encrypt_key128
_dsasozkdgmaesfsvzyll
  • 解压 MAMapKit.x86_64:
1
2
3
4
5
6
ar -x MAMapKit.x86_64

# 解压后获得三个新文件:
MAMapKit-x86_64-master.o # 存在重复 symbols 的文件
Pods-MAMapKit-dummy.o
__.SYMDEF SORTED # ar 命令生成的文件索引
  • 将 symbols 文件中的符号列表从 MAMapKit-x86_64-master.o 文件中全部删除掉,并生成一个新的文件 MAMapKit-x86_64-master.o.strip
1
ld -x -r -unexported_symbols_list symbols MAMapKit-x86_64-master.o -o MAMapKit-x86_64-master.o.strip
  • 将去除了重复 symbols 的文件重新打包并命名为 MAMapKit.x86_64_solved:
1
ar -r MAMapKit.x86_64_solved MAMapKit-x86_64-master.o.strip Pods-MAMapKit-dummy.o
  • 使用无重复的 x86_64 平台包替换旧的,然后合成新的 MAMapKit:
1
lipo MAMapKit -replace x86_64 MAMapKit.x86_64_solved -output MAMapKitNew
  • 复制 MAMapKitNew 到 MAMapKit.framework 中,删除原来的 MAMapKit 然后重命名 MAMapKitNew 为 MAMapKit,大功告成!

  • Xcode 重新编译,编译通过,项目成功运行!

  1. 在安卓上存在无法获取地图定位的问题。

尤其是当处于室内的时候,这种情况出现得比较频繁(定位后的回调中数据均为 0)。该库作者目前也没有较好的解决方案,所以最后决定在安卓上自己来定时刷新定位,如下:

1
2
3
4
5
6
7
8
9
10
11
12
13
14
15
16
17
18
19
20
21
22
23
24
25
26
27
28
29
30
31
32
33
34
35
36
<MapView
coordinate={Platform.select({
android: this.state.userLocation, // 使用手动定位到的位置作为地图中心点
ios: this.state.centerLocation // 使用地图定位到的位置作为地图中心点
})}
locationEnabled={Platform.OS === 'ios'} // 只有 iOS 上才用地图自带的定位
onLocation={({nativeEvent}) => {
if (Platform.OS === 'ios') {
this.setState({
centerLocation: {
latitude: nativeEvent.latitude,
longitude: nativeEvent.longitude
}
});
}
}}>

{
// 安卓上使用 marker 作为用户位置的标记
Platform.OS === 'android' ?
<MapView.Marker
draggable={false}
title='您的位置'
icon={() => (
<View style={styles.customMarker}>
<Image style={styles.markerImage} resizeMode={'contain'}
source={require('../../../assets/icon/ic_location_dot.png')}/>
</View>
)}
coordinate={{
latitude: this.state.userLocation.latitude,
longitude: this.state.userLocation.longitude,
}}
/> : null
}
</MapView>

我们只在 iOS 上使用地图自带的定位功能,而在安卓上添加一个 marker 作为用户位置,并且自己控制定位频率:

1
2
3
4
5
6
7
8
9
10
11
12
13
14
15
16
17
18
19
20
21
22
23
24
25
26
27
28
29
30
31
32
33
34
35
36
37
38
39
40
41
42
43
44
45
46
47
48
49
50
51
52
53
54
55
56
57
58
59
60
61
componentDidMount() {
// 进入地图后刷新定位
this.getLocation();

// 安卓上定时刷新定位
if (Platform.OS === 'android') {
this.refershInterval = setInterval(() => this.getLocation(), 60 * 1000);
}
}

getLocation(refresh) {
Platform.select({
android: async () => {
let hasAccess = await PermissionsAndroid.check(
PermissionsAndroid.PERMISSIONS.ACCESS_FINE_LOCATION);
if (hasAccess) {
if (refresh) {
ToastAndroid.show('刷新定位...', ToastAndroid.SHORT);
}
navigator.geolocation.getCurrentPosition(
(position) => this.geo_success(position),
(e) => this.geo_error(e), {timeout: 5000});
} else {
this.requestLocationPermission();
}
}
})();
}

geo_success(position) {
// 将 GPS 坐标转换为国测局坐标
let gcj02Location = wgs84togcj02(position.coords.longitude, position.coords.latitude);

this.setState({
userLocation: {
latitude: gcj02Location[1],
longitude: gcj02Location[0]
}
})
}

geo_error() {
ToastAndroid.show('获取定位失败,请稍候再试!', ToastAndroid.SHORT);
}

async requestLocationPermission() {
const granted = await PermissionsAndroid.request(
PermissionsAndroid.PERMISSIONS.ACCESS_FINE_LOCATION,
);

if (granted === PermissionsAndroid.RESULTS.GRANTED) {
this.getLocation();
} else {
ToastAndroid.show('未获得授权,无法显示您的位置!', ToastAndroid.SHORT);
}
}

componentWillUnmount() {
// 清除定时器
this.refershInterval && clearInterval(this.refershInterval);
}

这种方式唯一的不足就是定位的图标不是动态的了,比如精度范围和方向都无法显示出来。但是为了获取到定位,这也算是一种 trade off 了吧。

其他

代码规范

  1. 一个花括号 {} 引发的惨案。

你有没有在测试安卓的时候,遇到过这个报错:Cannot add a child that doesn’t have a YogaNode to a parent without a measure function! (Trying to add a ‘RCTRawText [text: }]’ to a ‘RCTView’)

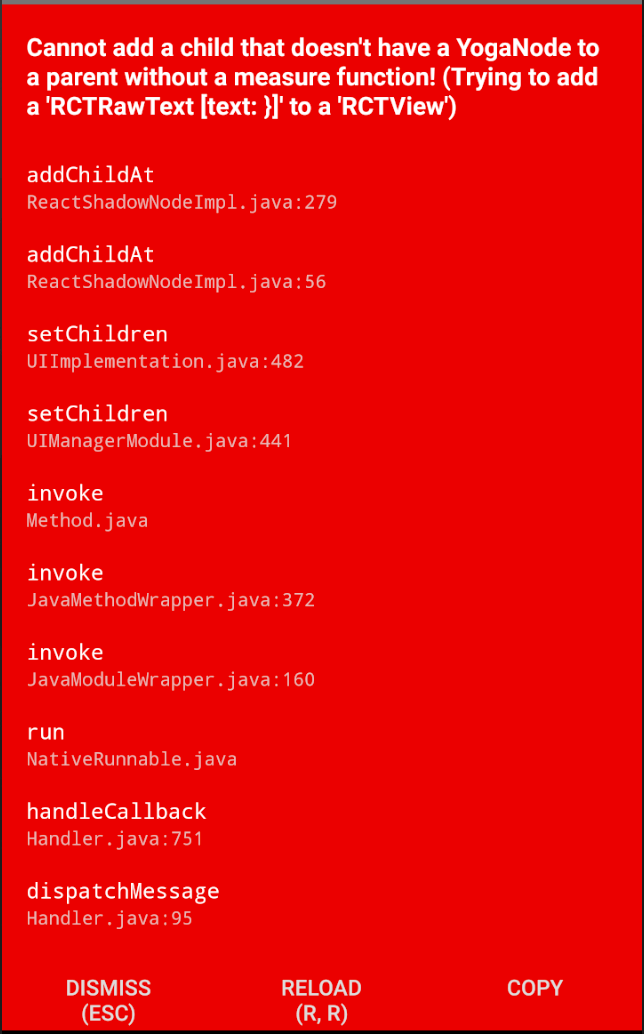
这么一点点信息,完全让人摸不着头脑对不对?最后折腾半天,发现原来是因为某个角落里躺着一个 { 或者 },砸电脑的心都有了。

所以,一定要注意代码规范啊, 不要在代码里乱嵌套代码或者乱写三目运算来判断某个 View 的显示或隐藏等等。

iOS 相关

模拟器调试

大部分情况下,如果在模拟器上跑不起来,只要关掉 Metro Bundler,然后使用 Xcode Clean 再重新运行就可以解决,有时候在执行了 Clean 之后可能会遇到 React 相关的 Target 构建报错,一般是依赖树没有构建完整,只要多执行几次 Run 等待依赖全部加载完毕就能解决。

如果还不行可以尝试卸载模拟器上的应用然后重新构建,也能解决很多奇怪的运行不起来的问题。

实在不行再尝试『全清』大法:

1
2
3
4
5
6
7
8
# 清除依赖,重新安装
rm -rf node_modules && npm install

# 清除缓存
react-native start --reset-cache

# 清除 npm 和 watchman 缓存
npm cache clear --force && watchman watch-del-all

相关 issue:issues/1924issues/4968

真机调试

大部分问题由于项目依赖的运行环境不一样,所以也没有什么统一的解决方案,只能靠自己谷歌慢慢摸索解决,使用上面模拟器中同样的方式有时候也能解决绝大部分问题。

但是有些问题比较特殊,而且出现次数较多,比如:RN 中 third-party 相关的问题。所以这里顺便记录下。

  1. Build input file double-conversion cannot be found

出现这个错误一般是没有安装 double-conversion 依赖,只要运行下面的命令就能解决:

1
cd node_modules/react-native/scripts && ./ios-install-third-party.sh && cd ../../../
  1. ios-configure-glog.sh: line 15: ./configure: No such file or directory

和 1 类似,也是比较常见的错误,解决方案:

1
cd ./node_modules/react-native/third-party/glog-0.3.4 && ../../scripts/ios-install-third-party.sh && cd ../../../../

这里出现报错的是 glog-0.3.4,如果你是其他 third-party 依赖或者其他版本也都可以用这种方法解决。

  1. 'config.h' file not found

一般出现在 1 之后,手动运行一下 configure 脚本就能解决:

1
cd node_modules/react-native/third-party/glog-0.3.4/; ./configure
  1. No member named '__rip' in '__darwin_arm_thread_state64

这个问题一般比较少见,但是我遇到过多次,只出现升级到 Xcode 10 之后而且使用的 RN 版本低于 0.57 的情况下。

造成这种错误一个可能的原因是,由于手动构建 glog,在真机上因为缺乏 arm 平台的相关配置导致出现错误。

我目前参考的是这个已经被关闭的 issue 中的 workaround 来解决这个问题的:

1
2
3
4
5
6
7
8
// 在 node_modules/react-native/third-party/glog-0.3.4/src/config.h 下搜索:
#define PC_FROM_UCONTEXT uc_mcontext->__ss.__rip
// 替换为:
#if defined(__arm__) || defined(__arm64__)
#define PC_FROM_UCONTEXT uc_mcontext->__ss.__pc
#else
#define PC_FROM_UCONTEXT uc_mcontext->__ss.__rip
#endif

如作者所说,RN 0.57 之后的 glog-0.3.5 脚本已经兼容了 Xcode 10(不能在 RN<0.57 中直接使用这个脚本),这个问题也就不存在了,所以推荐升级来解决,如果不想升级也可以用他提供的方法来解决。相关的 issue:issues/20774

另外,如果是 No member named '__rip' in '__darwin_i386_thread_state64,则可以添加

1
2
#elif defined(__i386__)
#define PC_FROM_UCONTEXT uc_mcontext->__ss.__eip

修改后的内容为:

1
2
3
4
5
6
7
8
/* How to access the PC from a struct ucontext */
#if defined(__arm__) || defined(__arm64__)
#define PC_FROM_UCONTEXT uc_mcontext->__ss.__pc
#elif defined(__i386__)
#define PC_FROM_UCONTEXT uc_mcontext->__ss.__eip
#else
#define PC_FROM_UCONTEXT uc_mcontext->__ss.__rip
#endif
  1. Unknown argument type '**attribute**' in method -[RCTAppState getCurrentappState:error:]

同样只有 rn 0.55.4 或更老的版本才会出现这个问题,相关 issue 见 issues/25138,解决方案在这里

1
2
3
4
5
6
7
// open at: node_modules/react-native/React/Base/RCTModuleMethod.mm
static BOOL RCTParseUnused(const char **input)
{
return RCTReadString(input, "__unused") ||
RCTReadString(input, "__attribute__((__unused__))") || // add this line
RCTReadString(input, "__attribute__((unused))");
}
  1. Undefined symbols for architecture x86_6: _OBJC_CLASS_xxxxx

这个问题一般是由 CocoaPods 缓存引起的,解决方法:

1
2
3
4
5
6
7
# 清除 Xcode 缓存
rm -rf ~/Library/Developer/Xcode/DerivedData
# 删除依赖
cd ios
pod deintegrate && pod cache clean --all
# 重新安装依赖
pod update && pod install

参考:相关 issue

Android 相关

Android 不推荐使用真机调试,原因是 hot reload 常常失效(RN 0.60 以上版本似乎体验改善很多了)。

真机上会遇到的问题和 iOS 差不多,这里就记录一些比较常用的命令吧。

1
2
3
4
5
6
7
8
9
10
11
12
13
14
15
16
17
# 推荐添加 ~/Library/Android/sdk/emulator/emulator 到 PATH 中
# 查看所有可用的安卓模拟器
emulator -list-avds
# 启动对应的模拟器
emulator -avd 'avd_name'
# 在指定设备上运行
react-native run-android --deviceId=DEVICE_ID

# 运行并配置端口号(默认为8081,避免占
react-native run-android --port=8088
# 运行 release 版本,必须配置 signingConfigs
react-native run-android --variant=release
# 唤醒开发者菜单,或者在 Metro 窗口中按 d
adb shell input keyevent KEYCODE_MENU

# 查看 RN 相关的日志
adb shell logcat *:S ReactNative:V ReactNativeJS:V

另外提供 iOS 相关的常用命令:

1
2
3
4
5
6
7
8
9
10
11
12
13
# 查看已安装的 iOS 模拟器列表
xcrun simctl list --json devices
# 启动指定的模拟器
xcrun instruments -w 'iPhone 8 Plus'
# 在指定的模拟器上运行
react-native run-ios --simulator="iPhone 8 Plus"
# iOS 模拟器录屏,保存位置为当前路径
xcrun simctl io booted recordVideo video.mov

# 删除所有的 Provisioning Profile
rm ~/Library/MobileDevice/Provisioning\ Profiles/*
# 删除 DerivedData,有时候可以解决一些奇怪的问题
rm -rf ~/Library/Developer/Xcode/DerivedData
其它问题
  1. 无法连接到 packager server,相关 issue:issue-15388issue-23380

通常是由于在 MainApplication 中导入了 BuildConfig 造成的,删除即可,见:Can’t open developer menu on react-native debug build

  1. Attempt to invoke virtual method ‘android.graphics.drawable.Drawable android.graphics.drawable.Drawable$ConstantState.newDrawable(android.content.res.Resources)’ on a null object reference

算是 Android 上比较令人头疼的一个问题了,目前除了重启 packager 没有更好的解决办法了,相关 issue 见 issue-17530,该 issue 目前仍然处于 open 状态中。