Android 开发艺术探索学习笔记(四)
![]()
结合 官方文档 阅读《Android 开发艺术探索》时所做的学习笔记。本篇记录第 6、7、12 章:Drawable、动画、Bitmap 相关。
Drawable
Drawable 是一种抽象的概念,表示一种可以在屏幕上进行绘制 (Draw) 的图像,常见的颜色和图片都可以是 Drawable。
Drawable 一般没有大小的概念,当作为 View 的 background 的时候,它会被拉伸至 View 同等大小。不过它有两个参数,getIntrinsicWidth 和 getIntrinsicHeight 表示内在的宽高,可以理解为默认宽高,比如显示一张图片时,这个值所对应的宽高就是当前图片的宽高,当作为 ColorDrawable 的时候该值则为 -1。
Drawable 的分类
Drawable 类型比较多,而且也没必要记住所有属性,需要时查文档就可以了:
- BitmapDrawable
- NinePatchDrawable
- ShapeDrawable
- LayerDrawable
- StateListDrawable
- LevelListDrawable
- TransitionDrawable
- InsetDrawable
- ClipDrawable
- ScaleDrawable
自定义 Drawable
只要重写 draw() 方法就可以了,例子见:android-art-res / Chapter_6
扩展阅读
Animation
动画可以分为属性动画 (Property Animation) 和 View 动画。View 动画通过对图像做各种变换(平移、旋转、缩放、透明度)从而产生动画效果,而属性动画则通过动态修改对象的属性来达到动画效果。推荐优先使用属性动画。
View 动画
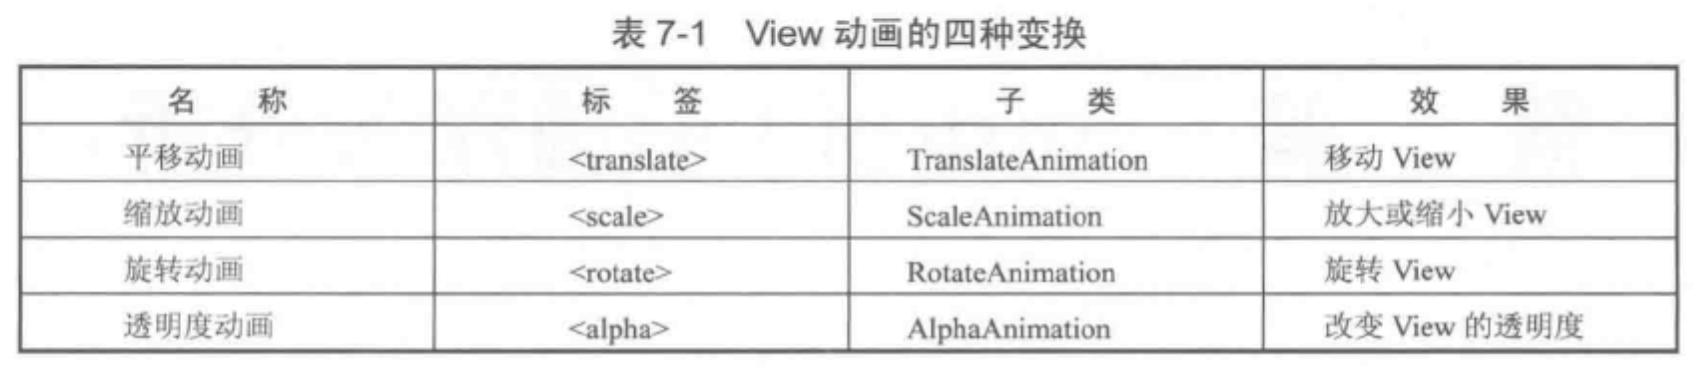
Tween animation
补间动画分为平移动画、缩放动画、旋转动画和透明度动画,它们既可以通过 XML 定义也可以通过代码动态创建。xml 文件一般放在 res/anim 目录下。
Frame Animation
帧动画其实就是一组预先定义好的图片,然后逐帧显示。使用帧动画如果图片过大,可能会导致 OOM,所以需要注意图片尺寸的问题。xml 文件一般放在 res/drawable 目录下。
特殊的 Tween Animation
LayoutAnimation
主要用于 ViewGroup,使用后子元素出场时会显示该动画,比如用于 ListView 或者 RecyclerView,为 item 设置进入时的从左往右进入,或者先变大然后恢复的动效。
扩展阅读:Auto animate layout updates
Activity 切换效果
我们可以通过在 activity 启动以及结束前使用 overridePendingTransition(enterAnimId, exitAnimId) 或者 ActivityOptions.makeCustomAnimation(context, enterAnimId, exitAnimId) 来指定 Activity 的切换效果。
另外,Android 5.0 之后还支持共享元素的过渡效果,具体请阅读:Start an activity using an animation
属性动画
属性动画与 View 动画不同,它对作用对象进行了扩展,因此可以对任何对象做动画,甚至可以没有对象,而且实现的效果也更加丰富多样。
属性动画的使用
常用的类有 ValueAnimator,ObjectAnimator 和 AnimatorSet。其中 ObjectAnimator 继承自 ValueAnimator,AnimatorSet 是一组动画集合。对应的 xml 标签分别是 <objectAnimator> <animator> <set>,xml 文件一般放在 res/animator 目录下。
不过属性动画使用代码进行操作更为简便,比如垂直平移一个 View 只要这样:
1 | |
插值器和估值器
插值器我理解为动画的变化方式(速率等),而估值器表示某一个时间节点下的变化的值。系统自带的插值器有:TimeInterpolator / LinearInterpolator / AccelerateDecelerateInterpolator 等,如果我们想要自定义动画效果,一般需要实现 Interpolator 和 TypeEvaluator。
属性动画的监听器
我们可以实现对动画播放过程的监听,主要通过 Animator.AnimatorListener,可以监听动画的开始、结束、取消、重新播放。 ValueAnimator.AnimatorUpdateListener,可以监听动画的更新,通过 ValueAnimator.getAnimatedValue() 获取变化值,我们还可以利用这个方法自定义出一些特殊效果。
属性动画的工作原理
通过获取 View 上的该属性的初始值(如果没有提供初始值则调用属性的 get 方法)和最终值(即我们 set 进去的值,xml 中的 toValue),然后以动画的效果,多次调用其 set 方法,直到达到最终值。源码解析就不贴了。
对于某些属性,即使提供了 set get 方法,但是对其做属性动画依旧没效果,原因是该属性不会带来 UI 显示上的变化,自然看上去就像没有效果了,比如 TextView 的 setWidth 和 getWidth,这个方法指定的是最大宽度,而不是实际显示的宽度,所以对它做属性动画不会有效果。
我们可以通过两种方式来改变这种状况,一种是通过包装原始对象,并为其提供 set 和 get 方法。另一种是通过上面提到的 ValueAnimator.AnimtorUpdateListener 加上估值器,手动修改对应的属性来实现效果。例子见:android-art-res / Chapter_7。推荐使用第一种,因为更容易复用。
扩展阅读
Bitmap 的加载和缓存
Bitmap 的高效加载
我们通过 Bitmap 加载图片的时候,一般都需要考虑图片大小的问题,图片越大占用的内存也就越多,一不小心还有可能造成 OOM,所以对于大图来说一般会做缩放后再显示。
核心思想是,首先通过为 BitmapFactory.Options 的 inJustDecodeBounds 设置 true,对图片进行采样获取到宽高(不会为图片像素点分配内存,因此不会消耗太大),然后再根据实际需要显示的宽高,计算出合理的缩放倍数,然后再对图片进行真正的加载。
1 | |
BitmapFactory 除了 decodeResource() 这一从资源中读取 Bitmap 的方式外,还可以使用 decodeFile()、decodeStream()、decodeByteArray() 这几种方式,分别表示从文件、字节流、Byte 数组中读取并加载 Bitmap,这些方法最终调用的都是 native 方法,由 Android 底层实现。
扩展阅读
内存缓存和磁盘缓存
在 RecyclerView 或者 ViewPager 中加载大量图片时,如果不做特殊处理,由于 View 的复用以及垃圾回收机制的存在,屏幕之外的图片很快会被回收掉,所以为了让页面保持流畅(不出现白屏也不会因为重复加载图片导致卡顿),我们就需要使用缓存来加速图片的恢复加载。
内存缓存
通过内存缓存(LruCache),我们可以将 Bitmap 缓存在应用内存中来提升加载速度。LruCache 中使用一个 LinkedHashMap 保存最近引用过的对象,当引用数量超出容量限制的时候就会将最近最少使用的对象移除。
使用 LruCache 缓存图片的时候需要考虑以下问题:
- 图片大小多少,占用多少内存?
- 一屏加载多少图片?有多少是需要预加载的?
- 你的 activity 除了图片之外,其他部分耗内存吗?
- 有哪些图片是频繁访问的?如果有特定图片是频繁访问的,可以选择常驻到内存缓存中。另外,如果有确定的访问频率不一致的图片组,可以考虑使用多个
LruCache。 - 如果是特别大的图片,可以考虑使用多种清晰度的图片,先加载低清晰度图片,然后再使用后台任务加载高清度的图片。
- 如果是本地图片,需要考虑在不同屏幕大小和屏幕密度上设备是否表现一致。
使用 LruCache 加载 Bitmap 的例子:
1 | |
加载 Bitmap 前先判断是否有缓存:
1 | |
磁盘缓存
内存缓存虽然速度快,但是我们也不能完全只依赖它,因为用户手机可能内存很小,应用随时可能被杀死(用户离开一段时间或者有更高优先级的任务占用了内存等等),当用户重新打开你的页面的时候,又要重新加载图片。
DiskLruCache 可以帮我们把加载过的 Bitmap 持久化到存储空间中从而减少用户重新加载的等待时间。
1 | |
因为涉及到文件读写,所以速度肯定要慢一点。而且可以看到,上面 DiskLruCache 是在子线程中创建的,所以当添加或者读取的时候,我们需要使用同步锁。
扩展阅读
ImageLoader 的实现与使用
ImageLoader 的实现
一个图片加载框架一般需要考虑:
- 图片的压缩
- 内存缓存与磁盘缓存
- 同步加载、异步加载
- 通过网络加载
具体实现见:android-art-res / Chapter_12
照片墙效果
优化列表卡顿
不要在
getView()方法中做耗时操作。比如加载图片是耗时操作,如果在getView()中进行加载,那么一定会导致卡顿,所以一般需要异步加载。控制异步任务的执行频率。当用户快速滑动列表时会产生大量异步任务,随后通知主线程进行大量的 UI 更新操作,此时很容易造成卡顿。所以我们可以为列表设置
OnScrollListener.onScrollStateChanged,并在其中判断是否滑动,禁止在滑动时加载图片。开启硬件加速。为 activity 设置
android:hardwareAccelerated="true",很多莫名的卡顿问题可能都是因为硬件加速没开。
系列文章
- Android 开发艺术探索学习笔记(一) - 第 1 章:生命周期和启动模式
- Android 开发艺术探索学习笔记(二) - 第 2 章:IPC 机制
- Android 开发艺术探索学习笔记(三) - 第 3~5 章:View 事件机制等
- Android 开发艺术探索学习笔记(四) - 第 6, 7, 12 章:Drawable,动画,Bitmap
- Android 开发艺术探索学习笔记(五) - 第 8, 10, 11 章:Window,线程和线程池,消息机制
- Android 开发艺术探索学习笔记(六) - 第 13~15 章:综合技术,JNI 和 NDK,性能优化